Configuring SDH/SONET
Posted January 30th 2013
Today, I'm going to walk through setting up a Corelatus SDH/SONET probe to look at E1/T1 lines carried on 155 Mbit/s SDH/SONET.
A quick look at SDH/SONET
Wikipedia has a good article about SDH/SONET. SONET is the standard mostly used in North America, SDH is the one mostly used in the rest of the world. The differences between the two are minor, for Corelatus' hardware it's just a setting in software.
SDH/SONET can both be used to carry various types of data. This time around, we'll just look at the E1/T1 lines. Here's a diagram of the scheme SONET uses to pack many E1/T1 lines into one 155 Mbit/s line, usually an optical fiber:
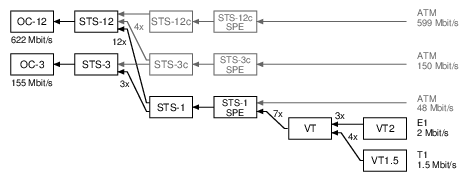
SONET calls the 155 Mbit/s line an "OC-3" (on the left of the diagram). SONET then has three layers of packing lines together (STS-1, VT, VT2), and that allows it to fit 3 x 7 x 3 = 63 E1 lines or 3 x 7 x 4 = 84 T1 lines.
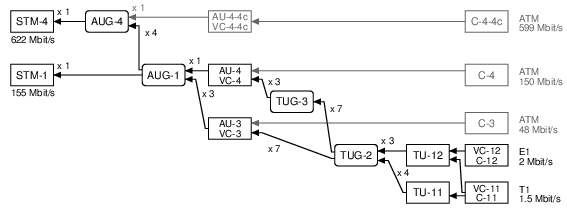
SDH uses different names for similar ideas. The end result is the same: it carries 63 E1s or 84 T1s:
To work with E1/T1 lines on a Corelatus SDH/SONETs Monitoring Probe, we need to do three things:
- Turn on (enable) SDH/SONET at the top level
- Obtain (map) a name for a particular E1/T1 line
- Turn on (enable) layer 1 processing on the E1/T1 line
Setting up SDH/SONET using the API
Same as all other Corelatus probes, the SDH/SONET probe responds to text commands sent over TCP port 2089. To support SDH/SONET, we added two new comands enable and map.
First, enable SDH/SONET at the top level, in SONET mode for this example:
  C: <enable name='sdh1'><attribute name='SONET' value='true'/></enable>
  G: <ok/>
Once sdh1 is enabled, you can walk through the containers carried on it using the query command. But we'll skip right to mapping one of the E1 links:
    C: <map target_type='pcm_source'>
          <sdh_source name='sdh1:hop2:lop7_4'/></map>
    G: <pcm_source name='pcm60'/>
Now that we know what name the E1 has (pcm60 in this example), we can enable L1 using the same command you'd use on a probe with an electrical E1:
    C: <enable name='pcm60'><attribute name='mode' value='T1'/></enable>
    G: <ok/>
After these three commands, you have a T1 which is ready to use just like a T1 on other Corelatus hardware, i.e. you can start layer 2 decoding on it, or copy out the data or...
The API manual goes into detail, with more examples, including how to use disable and unmap.
Setting up SDH/SONET using the CLI
The SDH/SONET probe has a command-line interface. It's useful for experimenting and exploring. Here's how to set up things the same as above:
    $ ssh cli@172.16.2.9
    cli@172.16.2.9's password: (mail matthias@corelatus.se)
    GTH CLI, press Enter to start (^D to exit)

    GTH CLI started. 'help' lists commands
    gth 172.16.2.9> enable sdh1 SONET true
    ok
    gth 172.16.2.9> map sdh1:hop2:lop7_4
    Mapped to: pcm60
    ok
    gth 172.16.2.9> enable pcm60 mode T1
    ok
Setting up SDH/SONET using Python
Corelatus has sample code in a few languages, including Python, which shows how to use the API to set up an SDH link just like above. Here's the python demo program doing the same thing:
    $ ./gth.py enable 172.16.2.9 sdh1 SONET true
    $ ./gth.py map 172.16.2.9 sdh1:hop2:lop7_4
    pcm60
    $ ./gth.py enable 172.16.2.9 pcm60 mode T1
The C and Erlang sample code (on the same page) provides the same functionality, but with slightly different syntax.
Permalink | Tags: GTH, python, SDH and SONET